
|
(Image: Picto Desk Storage Schreibtisch Ablage Archiv) For land drainage facilities, document additional information as appropriate, such as: -
Property/property designation (e.g., name of facility).
-
Cadastral information (e.g., district/field/parcel/house number)
-
Building designation (e.g., main building)
-
Site sketches
|

|
|
|
According to EN 13508-2, the following pieces of information must also be recorded within the framework of the visual inspection from inside: -
Identification of the sewer section either directly and/or by stating two intersection points (In the case that a pipe is connected to the main pipe without a manhole, the intersection at the branch can be determined by the identification of the main pipe sewer section and the distance from a reference point.)
|
|
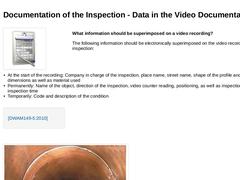
What information should be superimposed on a video recording? The following information should be electronically superimposed on the video recording of the inspection: -
At the start of the recording: Company in charge of the inspection, place name, street name, shape of the profile and its dimensions as well as material used
-
Permanently: Name of the object, direction of the inspection, video counter reading, positioning, as well …
|

|
(Image: Picto Präsentation) The personnel responsible for the inspection must have sufficient specialist knowledge of the inspection of wastewater sewers and drains, both on the part of the client and on the part of the engineering firm and the inspector. This expertise must be kept up to date through -
successful inspection training, e.g. at the manufacturer of the equipment used, and
-
at least one year of inspection experience should be demonstrated.
|

|
What expertise is required to carry out the inspection correctly? The expertise should include the following points: -
Knowledge of condition patterns and causes of defects
-
Knowledge of the content and structure of the data flow (e.g. data exchange)
-
Knowledge of drainage technology, materials and methods for the rehabilitation of drain and sewer systems
-
Knowledge of the interdependencies in the workflow for structured condition …
|

|
(Image: Picto Beratung) During preparation, monitoring and assessment, the client of an inspection measure is responsible for ensuring that all necessary preparations and coordination take place and that the inspector is provided with a proper information and data basis. When When awarding a contract, care must be taken to ensure that the quality requirements for the services to be awarded are described precisely and in detail and can … |
|
During the execution of the inspection measure, these must be continuously and professionally monitored and accompanied from the beginning. This includes a random analysis of the entire visual and digital inspection results. Any discrepancies or defects found must be clarified and rectified immediately - and the causes eliminated. |
|
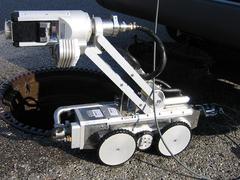
This module provides a comprehensive overview of direct and indirect optical inspection methods like CCTV for qualitative condition assessment of pipelines and sewers as well as manholes. In terms of content, the module thus belongs to the topic block "INVESTIGATION", the first of the four basic activities within the framework of integral urban drainage management according to EN 752. The optical inspection procedures presented here provide an essential basis for assessing the performance of the drain and sewer system or for developing the rehabilitation plan. After completing this module, you will have a sound knowledge of: - Inspection object requirements;
- Compilation of necessary equipment for direct optical inspection;
- Investigations in extended recording of defect extent;
- Procedures and methods of indirect inspection and
- Its fields of application and limitations;
- As well as requirements for data management, data acquisition, data export and recording with sewer acquisition software.
|

|
Summary: This module gives an overview of methods of inspection from the inside for quantitative condition assessment. It is to be understood as a supplement to the module "Optical inspection from the inside for qualitative condition recording" and thus belongs in terms of content to the topic block "INVESTIGATION", the first of the four basic activities within the framework of the integral urban drainage management according to EN 752. The procedures … |
|
The results of the visual inspection are often not sufficient for a comprehensive description of the sewers’ condition and the derivation of satisfactory statements on the type and extent of damage, type and extent of rehabilitation measures and hydraulic performance capacity. That is why a quantitative determination of the actual condition might also be required for a technically and economically sound rehabilitation planning This relates in particular … |
|
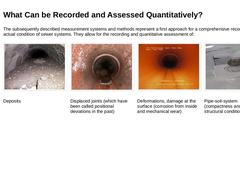
The subsequently described measurement systems and methods represent a first approach for a comprehensive recording of the actual condition of sewer systems. They allow for the recording and quantitative assessment of: (Image: Deposition in a sewer - Hard or compacted material) (Image: Displaced connection (BAJ) - Radial displacement (B)) (Image: Deformation of a plastic pipe (BAA) - Vertical (A)) (Image: Cavity formation under the maintenance of a road … |

|
Within the scope of the visual inspection from inside the pipe, deposits are usually listed and assessed with respect to their effects on a reduction of the cross section just as this is done in the case of adhesive substances (incrustations), protruding connections and roots. The assessment is based on a statement of the deposit height in percent of the vertical dimension of the pipe. (Image: Deposition in a sewer - Hard or compacted material) (Image: … |

|
The sewer measuring raft can be used in sewers from DN 700 to DN 2000. It floats on the sewage and measures the water level and the deposit height via sensing arms. The stored values of the measuring electronics are evaluated on a computer. In this way, the deposit height can be determined exactly. However, if the pipe size and shape change, the reference angles of the scanning arms must be adjusted manually and the measuring raft cannot be used … |
|
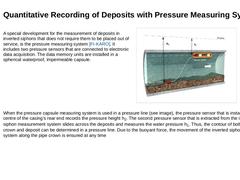
A special development for the measurement of deposits in inverted siphons that does not require them to be placed out of service, is the pressure measuring system [FI-KARO]. It includes two pressure sensors that are connected to electronic data acquisition. The data memory units are installed in a spherical waterproof, impermeable capsule. (Image: Schematic diagram of a deposit measurement using the culvert survey unit (DVE)) When the pressure capsule … |
|
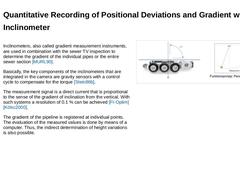
Inclinometers, also called gradient measurement instruments, are used in combination with the sewer TV inspection to determine the gradient of the individual pipes or the entire sewer section [MURL90]. Basically, the key components of the inclinometers that are integrated in the camera are gravity sensors with a control cycle to compensate for the torque [Stein86b]. The measurement signal is a direct current that is proportional to the sense of the … |
|
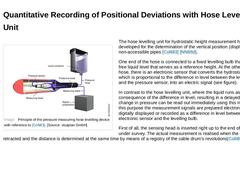
(Image: Principle of the pressure measuring hose levelling device with reference to [Colli83]) The hose levelling unit for hydrostatic height measurement has been developed for the determination of the vertical position (displaced joints) of non-accessible pipes [Colli83] [NN86d]. One end of the hose is connected to a fixed levelling bulb that contains a free liquid level that serves as a reference height. At the other end of the hose, there is an … |

|
Deformations of flexible pipes and cracked rigid pipes, cross-sectional dimensions and thus also indirectly internal corrosion and mechanical wear of sewers, but also deposits can be detected during the inspection with the sewer camera or during the walk-through, but a quantitative statement is only possible with the help of appropriate measuring devices or methods. In the quantitative assessment of deformations and surface damages in wastewater pipes … |
|
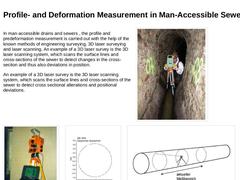
In man-accessible drains and sewers , the profile and predeformation measurement is carried out with the help of the known methods of engineering surveying, 3D laser surveying and laser scanning. An example of a 3D laser survey is the 3D laser scanning system, which scans the surface lines and cross-sections of the sewer to detect changes in the cross-section and thus also deviations in position. An example of a 3D laser survey is the 3D laser scanning … |
|
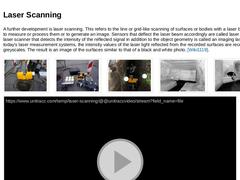
A further development is laser scanning. This refers to the line or grid-like scanning of surfaces or bodies with a laser beam in order to measure or process them or to generate an image. Sensors that deflect the laser beam accordingly are called laser scanners. A laser scanner that detects the intensity of the reflected signal in addition to the object geometry is called an imaging laser scanner. In today's laser measurement systems, the intensity … |
|
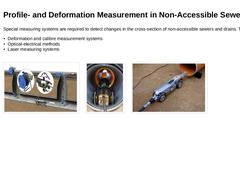
Special measuring systems are required to detect changes in the cross-section of non-accessible sewers and drains. These include: -
Deformation and calibre measurement systems
-
Optical-electrical methods
-
Laser measuring systems
(Image: Principle sketch for mechanical deformation measurement based on [ATVA139c] [FI-Optim]) (Image: Tests with light ring measuring system of the company JT-elektronik GmbH) (Image: Inspection and laser measurement system … |

|
|
|
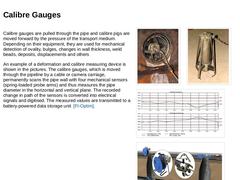
Calibre gauges are pulled through the pipe and calibre pigs are moved forward by the pressure of the transport medium. Depending on their equipment, they are used for mechanical detection of ovality, bulges, changes in wall thickness, weld beads, deposits, displacements and others An example of a deformation and calibre measuring device is shown in the pictures. The calibre gauges, which is moved through the pipeline by a cable or camera carriage, … |
|
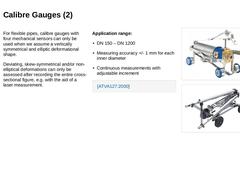
For flexible pipes, calibre gauges with four mechanical sensors can only be used when we assume a vertically symmetrical and elliptic deformational shape. Deviating, skew-symmetrical and/or non-elliptical deformations can only be assessed after recording the entire cross-sectional figure, e.g. with the aid of a laser measurement. |
|
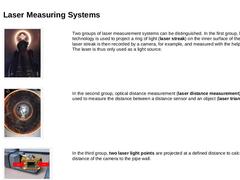
(Image: Tests with light ring measuring system of the company JT-elektronik GmbH - Bild 2) Two groups of laser measurement systems can be distinguished. In the first group, laser technology is used to project a ring of light (laser streak) on the inner surface of the pipe. This laser streak is then recorded by a camera, for example, and measured with the help of a scale. The laser is thus only used as a light source. (Image: Laser distance measurement) |