|
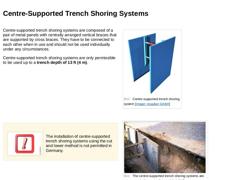
Centre-supported trench shoring systems are composed of a pair of metal panels with centrally arranged vertical braces that are supported by cross braces. They have to be connected to each other when in use and should not be used individually under any circumstances. Centre-supported trench shoring systems are only permissible to be used up to a trench depth of 13 ft (4 m). (Image: Centre-supported trench shoring system) |
|
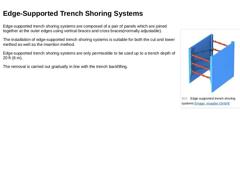
Edge-supported trench shoring systems are composed of a pair of panels which are joined together at the outer edges using vertical braces and cross braces(normally adjustable). The installation of edge-supported trench shoring systems is suitable for both the cut and lower method as well as the insertion method. Edge-supported trench shoring systems are only permissible to be used up to a trench depth of 20 ft (6 m). The removal is carried out gradually … |
|
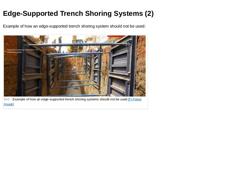
Example of how an edge-supported trench shoring system should not be used: (Image: Example of how an edge-supported trench shoring systems should not be used) |
|
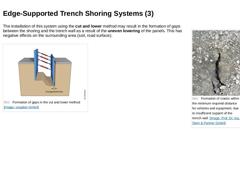
(Image: Formation of cracks within the minimum required distance for vehicles and equipment, due to insufficient support of the trench wall) The installation of this system using the cut and lower method may result in the formation of gaps between the shoring and the trench wall as a result of the uneven lowering of the panels. This has negative effects on the surrounding area (soil, road surface). (Image: Formation of gaps in the cut and lower method) |
|
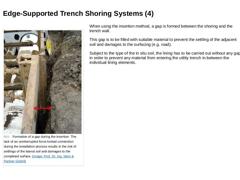
(Image: Formation of a gap during the insertion: The lack of an uninterrupted force-locked connection during the installation process results in the risk of settlings of the lateral soil and damages to the completed surface) When using the insertion method, a gap is formed between the shoring and the trench wall. This gap is to be filled with suitable material to prevent the settling of the adjacent soil and damages to the surfacing (e.g. road). Subject … |
|
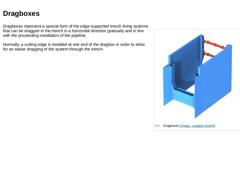
(Image: Dragboxes) Dragboxes represent a special form of the edge-supported trench lining systems that can be dragged in the trench in a horizontal direction gradually and in line with the proceeding installation of the pipeline. Normally, a cutting edge is installed at one end of the dragbox in order to allow for an easier dragging of the system through the trench. |
|
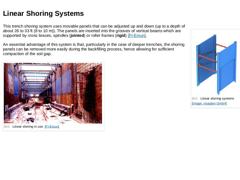
(Image: Linear shoring systems) This trench shoring system uses movable panels that can be adjusted up and down (up to a depth of about 26 to 33 ft (8 to 10 m)). The panels are inserted into the grooves of vertical beams which are supported by cross braces, spindles (jointed) or roller frames (rigid) [FI-Emun]. An essential advantage of this system is that, particularly in the case of deeper trenches, the shoring panels can be removed more easily during … |

|
In the case of the linear shoring systems with a boogie car (roller frame), the vertical beams are not rigidly connected to the cross braces, but rather to vertically moveable roller frames that run along a groove on the inside face of the vertical beam. (Image: Adaptation of the shoring wall height to the necessary trench depth with different panel combinations) (Image: Detailed image of linear shoring system with Boogie car (roller frame)) |
|
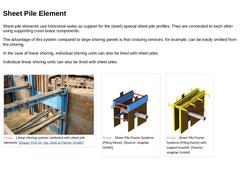
Sheet pile elements use horizontal wales as support for the (steel) special sheet pile profiles. They are connected to each other using supporting cross brace components. The advantage of this system compared to large shoring panels is that crossing services, for example, can be easily omitted from the shoring. In the case of linear shoring, individual shoring units can also be lined with sheet piles. Individual linear shoring units can also be lined … |
|
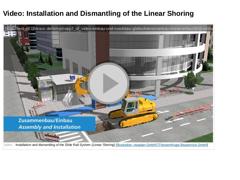
(Video: Video:Installation and dismantling of the Slide Rail System(Linear Shoring)) Video: Installation and dismantling of the Slide Rail System (Linear Shoring) [Illustration: visaplan GmbH] [ThyssenKrupp Bauservice GmbH]. This interactive object is only visible in the online version of the module. |
|
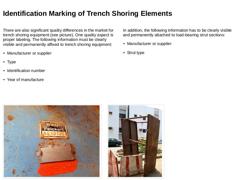
There are also significant quality differences in the market for trench shoring equipment (see picture). One quality aspect is proper labeling. The following information must be clearly visible and permanently affixed to trench shoring equipment: -
Manufacturer or supplier
-
Type
-
Identification number
-
Year of manufacture
In addition, the following information has to be clearly visible and permanently attached to load-bearing strut sections: |

|
Trench shoring elements must be accompanied with the manufacturer‘s assembly instructions, which must include the following details in particular: -
Weight of the shoring element
-
Dimensions
-
Interrelation between the load (earth pressure) and stress resistance of the shoring element (subject to the element width, the element length and the element height as well as the arrangement of the braces) in the form of tables or diagrams
-
Permissible combinations …
|
|
|
|
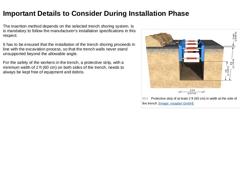
(Image: Protective strip of at least 2 ft (60 cm) in width at the side of the trench) The insertion method depends on the selected trench shoring system. Is is mandatory to follow the manufacturer‘s installation specifications in this respect. It has to be ensured that the installation of the trench shoring proceeds in line with the excavation process, so that the trench walls never stand unsupported beyond the allowable angle. For the safety of the … |
|
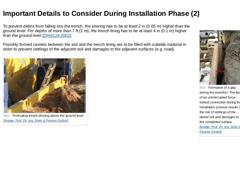
(Image: Formation of a gap during the insertion: The lack of an uninterrupted force-locked connection during the installation process results in the risk of settlings of the lateral soil and damages to the completed surface) To prevent debris from falling into the trench, the shoring has to be at least 2 in (0.05 m) higher than the ground level. For depths of more than 7 ft (2 m), the trench lining has to be at least 4 in (0.1 m) higher than the ground … |
|
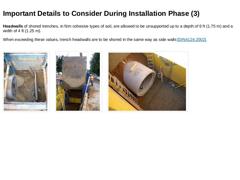
Headwalls of shored trenches, in firm cohesive types of soil, are allowed to be unsupported up to a depth of 6 ft (1.75 m) and a width of 4 ft (1.25 m). When exceeding these values, trench headwalls are to be shored in the same way as side walls [DIN4124:2002]. (Image: Entry of soil caused by water due to a leaking headwall shoring) (Image: Securing the headwall of the shored trench by means of a steel plate (end plate)) (Image: Securing the headwall … |
|
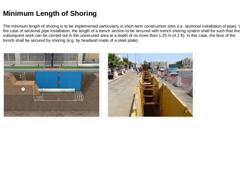
The minimum length of shoring is to be implemented particularly in short-term construction sites (i.e. sectional installation of pipe). In the case of sectional pipe installation, the length of a trench section to be secured with trench shoring system shall be such that the subsequent work can be carried out in the unsecured area at a depth of no more than 1.25 m (4.1 ft). In this case, the face of the trench shall be secured by shoring (e.g. by … |

|
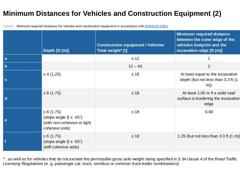
(Image: Example for non-compliance to the minimum required distance) (Image: Example for non-compliance to the minimum required distance) It has to be ensured that road vehicles and, in particular, construction equipment, are kept at a sufficient distance from the trench in order to prevent overloading the trench shoring. The following minimum distances are to be kept for horizontally and vertically lined trenches: |
|
(Table: Minimum required distances for vehicles and construction equipment in accordance with DIN 4124a) |
|
|
|
The installation methods of trench lining elements are basically classified into the insertion method and the cut and lower method. |
|
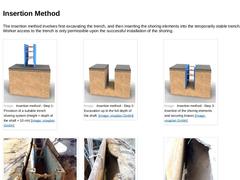
The insertion method involves first excavating the trench, and then inserting the shoring elements into the temporarily stable trench. Worker access to the trench is only permissible upon the successful installation of the shoring. (Image: Insertion method - Step 1: Provision of a suitable trench shoring system (Height = depth of the shaft + 10 cm)) (Image: Insertion method - Step 2: Excavation up to the full depth of the shaft) (Image: Insertion method - … |
|
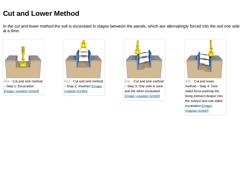
In the cut and lower method the soil is excavated in stages between the panels, which are alternatingly forced into the soil one side at a time. (Image: Cut and sink method – Step 1: Excavation) (Image: Cut and sink method – Step 2: Insertion) (Image: Cut and sink method – Step 3: One side is sunk and the other excavated) (Image: Cut and lower method – Step 4: One-sided force pushing the lining element deeper into the subsoil and one-sided excavation) |
|
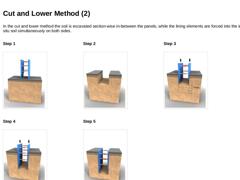
In the cut and lower method the soil is excavated section-wise in-between the panels, while the lining elements are forced into the in situ soil simultaneously on both sides. Step 1 (Image: Cut and sink method (double-sided) - Step 1: Provision of a suitable trench lining system (Height = Depth of the shaft + 10 cm)) Step 2 (Image: Cut and sink method (double-sided) - Step 2: Excavation) Step 3 (Image: Cut and sink method (double-sided) - Step 3:) |
|
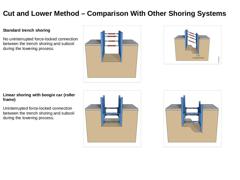
Standard trench shoring No uninterrupted force-locked connection between the trench shoring and subsoil during the lowering process. (Image: Standard trench lining) (Image: Standard trench lining) Linear shoring with boogie car (roller frame) Uninterrupted force-locked connection between the trench shoring and subsoil during the lowering process. (Image: Linear shoring with boogie car (roller frame)) (Image: Linear shoring with boogie car (roller frame)) |