|
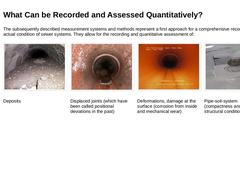
The subsequently described measurement systems and methods represent a first approach for a comprehensive recording of the actual condition of sewer systems. They allow for the recording and quantitative assessment of: (Image: Deposition in a sewer - Hard or compacted material) (Image: Displaced connection (BAJ) - Radial displacement (B)) (Image: Deformation of a plastic pipe (BAA) - Vertical (A)) (Image: Cavity formation under the maintenance of a road … |
|
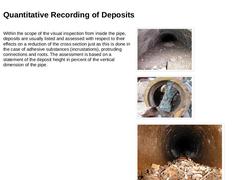
Within the scope of the visual inspection from inside the pipe, deposits are usually listed and assessed with respect to their effects on a reduction of the cross section just as this is done in the case of adhesive substances (incrustations), protruding connections and roots. The assessment is based on a statement of the deposit height in percent of the vertical dimension of the pipe. (Image: Deposition in a sewer - Hard or compacted material) (Image: … |
|
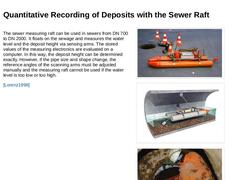
The sewer measuring raft can be used in sewers from DN 700 to DN 2000. It floats on the sewage and measures the water level and the deposit height via sensing arms. The stored values of the measuring electronics are evaluated on a computer. In this way, the deposit height can be determined exactly. However, if the pipe size and shape change, the reference angles of the scanning arms must be adjusted manually and the measuring raft cannot be used … |
|
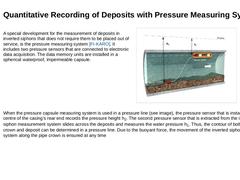
A special development for the measurement of deposits in inverted siphons that does not require them to be placed out of service, is the pressure measuring system [FI-KARO]. It includes two pressure sensors that are connected to electronic data acquisition. The data memory units are installed in a spherical waterproof, impermeable capsule. (Image: Schematic diagram of a deposit measurement using the culvert survey unit (DVE)) When the pressure capsule … |
|
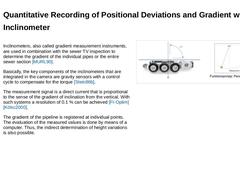
Inclinometers, also called gradient measurement instruments, are used in combination with the sewer TV inspection to determine the gradient of the individual pipes or the entire sewer section [MURL90]. Basically, the key components of the inclinometers that are integrated in the camera are gravity sensors with a control cycle to compensate for the torque [Stein86b]. The measurement signal is a direct current that is proportional to the sense of the … |
|
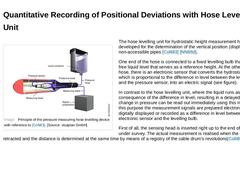
(Image: Principle of the pressure measuring hose levelling device with reference to [Colli83]) The hose levelling unit for hydrostatic height measurement has been developed for the determination of the vertical position (displaced joints) of non-accessible pipes [Colli83] [NN86d]. One end of the hose is connected to a fixed levelling bulb that contains a free liquid level that serves as a reference height. At the other end of the hose, there is an … |

|
Deformations of flexible pipes and cracked rigid pipes, cross-sectional dimensions and thus also indirectly internal corrosion and mechanical wear of sewers, but also deposits can be detected during the inspection with the sewer camera or during the walk-through, but a quantitative statement is only possible with the help of appropriate measuring devices or methods. In the quantitative assessment of deformations and surface damages in wastewater pipes … |
|
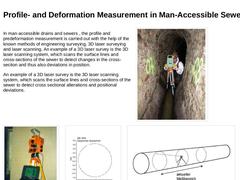
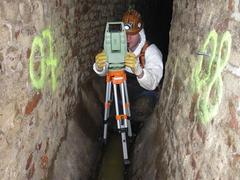
In man-accessible drains and sewers , the profile and predeformation measurement is carried out with the help of the known methods of engineering surveying, 3D laser surveying and laser scanning. An example of a 3D laser survey is the 3D laser scanning system, which scans the surface lines and cross-sections of the sewer to detect changes in the cross-section and thus also deviations in position. An example of a 3D laser survey is the 3D laser scanning … |
|
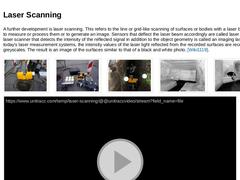
A further development is laser scanning. This refers to the line or grid-like scanning of surfaces or bodies with a laser beam in order to measure or process them or to generate an image. Sensors that deflect the laser beam accordingly are called laser scanners. A laser scanner that detects the intensity of the reflected signal in addition to the object geometry is called an imaging laser scanner. In today's laser measurement systems, the intensity … |
|
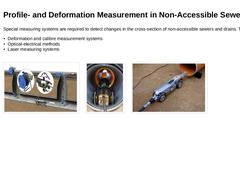
Special measuring systems are required to detect changes in the cross-section of non-accessible sewers and drains. These include: -
Deformation and calibre measurement systems
-
Optical-electrical methods
-
Laser measuring systems
(Image: Principle sketch for mechanical deformation measurement based on [ATVA139c] [FI-Optim]) (Image: Tests with light ring measuring system of the company JT-elektronik GmbH) (Image: Inspection and laser measurement system … |

|
|
|
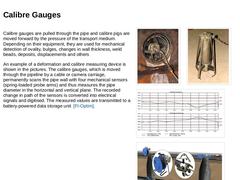
Calibre gauges are pulled through the pipe and calibre pigs are moved forward by the pressure of the transport medium. Depending on their equipment, they are used for mechanical detection of ovality, bulges, changes in wall thickness, weld beads, deposits, displacements and others An example of a deformation and calibre measuring device is shown in the pictures. The calibre gauges, which is moved through the pipeline by a cable or camera carriage, … |
|
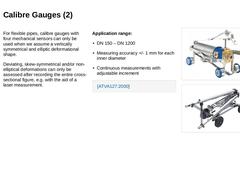
For flexible pipes, calibre gauges with four mechanical sensors can only be used when we assume a vertically symmetrical and elliptic deformational shape. Deviating, skew-symmetrical and/or non-elliptical deformations can only be assessed after recording the entire cross-sectional figure, e.g. with the aid of a laser measurement. |

|
(Image: Tests with light ring measuring system of the company JT-elektronik GmbH - Bild 2) Two groups of laser measurement systems can be distinguished. In the first group, laser technology is used to project a ring of light (laser streak) on the inner surface of the pipe. This laser streak is then recorded by a camera, for example, and measured with the help of a scale. The laser is thus only used as a light source. (Image: Laser distance measurement) |
|
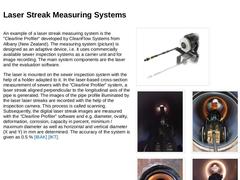
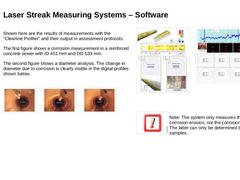
An example of a laser streak measuring system is the "Clearline Profiler" developed by CleanFlow Systems from Albany (New Zealand). The measuring system (picture) is designed as an adaptive device, i.e. it uses commercially available sewer inspection systems as a carrier unit and for image recording. The main system components are the laser and the evaluation software. The laser is mounted on the sewer inspection system with the help of a holder adapted … |
|
Shown here are the results of measurements with the "Clearline Profiler" and their output in assessment protocols. The first figure shows a corrosion measurement in a reinforced concrete sewer with ID 451 mm and OD 533 mm. The second figure shows a diameter analysis. The change in diameter due to corrosion is clearly visible in the digital profiles shown below. (Image: Laser Streak Measuring System in the sewer with indication of the deformation) (Image: … |
|
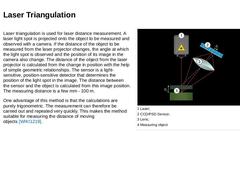
Laser triangulation is used for laser distance measurement. A laser light spot is projected onto the object to be measured and observed with a camera. If the distance of the object to be measured from the laser projector changes, the angle at which the light spot is observed and the position of its image in the camera also change. The distance of the object from the laser projector is calculated from the change in position with the help of simple … |
|
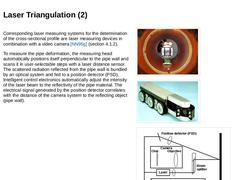
Corresponding laser measuring systems for the determination of the cross-sectional profile are laser measuring devices in combination with a video camera [NN95g] (section 4.1.2). To measure the pipe deformation, the measuring head automatically positions itself perpendicular to the pipe wall and scans it in user-selectable steps with a laser distance sensor. The scattered radiation reflected from the pipe wall is bundled by an optical system and fed … |
|
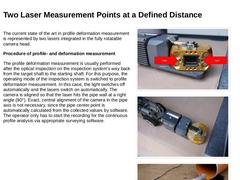
The current state of the art in profile deformation measurement is represented by two lasers integrated in the fully rotatable camera head. Procedure of profile- and deformation measurement The profile deformation measurement is usually performed after the optical inspection on the inspection system's way back from the target shaft to the starting shaft. For this purpose, the operating mode of the inspection system is switched to profile deformation … |
|
Since the two lasers have a defined distance to each other, the distance of the camera to the pipe wall can also be determined using the two laser points. With the camera head rotating, the pipe profile is determined in this way. By moving the inspection system backwards (at a uniform speed of about 5 to 7 cm/sec) while simultaneously rotating the camera, the entire profile of the sewer is thus recorded. A spiral of laser measurement points is created. … |

|
The profile deformation measurement is not only used for damage assessment but also provides essential information for the planning of renovation measures, e.g. in the form of "CIPP - cured-in-place pipes" for the fabrication of CIPP liners. By adapting the ordering dimensions of the liners to the real maximum and minimum profile dimensions over the entire length of the respective pipe, liners can be manufactured whose elongation behavior … |
|
This module gives an overview of methods of inspection from the inside for quantitative condition assessment. It is to be understood as a supplement to the module "Optical inspection from the inside for qualitative condition recording" and thus belongs in terms of content to the topic block "INVESTIGATION", the first of the four basic activities within the framework of the integral urban drainage management according to EN 752. The procedures presented here provide an essential basis for the assessment of the performance of the drain and sewer system or for developing the rehabilitation plan. After completing this module, you will have a sound knowledge of: - Areas of application and
- Methods of quantitative condition assessment.
|
|
Aug 10, 2021
News
Desiree Willis
Turkish XRE Bores Best Day, Week & Month
|

|
Aug 12, 2021
News
Envirosight
This E-Book Will Make You a Smarter Buyer
|

|
Aug 17, 2021
News
Joe Loughmiller
Indiana American Water President Matt Prineannounced the company’s acquisition of the River’s Edge water and wastewater systems in southeast Indiana. The purchase of the system from Wastewater One, LLC, adds approximately 100 water and 80 wastewater customers to the company’s customer base, which represents a population of nearly 300 residents.
|